Immersion Research 7Figure Dry Top Review

I’ll be completely honest, I bought my Methyl Blue 7Figure Dry Top because I already had a 7Figure Dry Suit in Lime Green and couldn’t quite convince myself it was a good idea to have two dry suits just because I couldn’t decide which colour I liked best.

Flying Start

Photo: Kirstie Macmillan, Paddler: Mathew Wilkinson, River: Tryweryn

I didn’t really need a cag, as my 7Figure Dry Suit isn’t too heavy to wear in the Autumn (even though it’s nice and toasty in the Winter), and my Rival Shorty Cag is pretty effective at keeping me comfortable even when the Summer sun starts to fade away.

I’m pleased to say that I’ve had several moments of rational thought on the subject since buying my 7Figure Dry Top though, and I still don’t regret the purchase; it’s great having that extra flexibility in my gear selection for those days where the weather could go either way, or it’s right in-between the perfect temperature for a shorty cag or a dry suit.

The 7Figure Dry Top also isn’t just half of the dry suit; it shares many of the same benefits, like super comfy yet highly durable material, surprisingly high levels of dryness that are yet to fade and a great fit, but it also adds in fuss free neoprene over-cuffs at the wrists.

I gave the dry suit 5 stars, so this probably deserves 5 and a half – it certainly blows any other dry cag I’ve ever owned out of the water, and in the water is exactly where I want to be (or preferably on it)!

Immersion Research 7Figure Drysuit Review

This thing is UNBELIEVABLY comfortable, and I don’t just mean the super silky material that feels almost like it’s flowing through your hands when you first unwrap it!

Not-so-Low Force

Kayaking becomes somewhat of a spectator sport when you’ve lost your boat, but at least I was dry! Photo by Martin-In-Teasdale.

I’ve had drysuits from several brands that have either been way too snug (even when I’m not being overly optimistic with my size choice), or make me look like MC Hammer and thwart my efforts to gracefully traverse even the lowest of fallen trees; the IR 7Figure Suit has no such issues, so I spend much less time squeezing air out of it and barely notice it’s there when I’m moving about on/around/in the river.

I’m probably the definition of an average paddler, so in the 12 months I’ve been using this suit it has seen several rough swims, a few hacks through dense undergrowth and plenty of clumsy moments getting into and out of kayaks, and it’s still bone dry and going strong.

I could complain about the neoprene over cuff of the neck being a little loose or say that the rear entry zip could be slightly better placed, but compared to the other dry suits on the market right now, that would be like saying my gold bars are a little too heavy, or my new Ferrari isn’t quite the right shade of red… This suit is great, and so is the price, so go buy one!

(P.S. I also love the unobtrusive neoprene waistband that keeps the suit up when you’ve taken off the top half, and the bright colours are beautiful!)

Don’t Lose Your Kit, Label It!

I’ve scrawled my contact details (and some funky designs) on to various items of paddling kit using many different implements over the years; Paint Markers, Sharpies and even Radiator Paint have been previous favourites, but I’ve been introduced to a better solution…

Toughtag3

2 Sheets of Toughtags and some offcuts of other colours they were kind enough to send me for a purpose you’ll see later…

Toughtags are fantastic! They don’t scratch, crack or rub off and it doesn’t matter how bad your handwriting might be, as they’re printed in an easily readable font!

It can often be difficult to write legibly on smaller items of kit too, which is another advantage of Toughtags, as even the smaller font sizes are still clear.

Toughtag4

Two labelled carabiners, and one in progress; Toughtags were originally designed for climbing gear so are perfect for this!

If you’re on a safety course, or dealing with a real life whitewater rescue situation, it can often be a pain in the bum to work out whose carabiners and pulleys are whose after everything has calmed down again; labelling them with Toughtags is a great way to make yours immediately identifiable.

For us kayaking types, Toughtags even offer an extra-long tag that will wrap around any size of paddle shaft (probably one of the most lost items when on the river!) – just send them an email asking for the longer tags!

Toughtag1

Comparison of the regular sized Toughtags (top) and extra-long Toughtags (bottom).

thumb_IMG_0099_1024

Labelling my Werner Sho-Guns with the extra-long Toughtags.

Labelling your kit doesn’t guarantee you’ll get it back, but with no real GPS tracking option that is compact, waterproof, affordable and has a long-lasting battery, it’s the best chance you’ve got; it’s even mandatory at places like Lee Valley (so they know who to blame when a stray item jams the pumps!)

Make sure you include an email address and phone number (with international dialling code), so that whoever finds your kit has plenty of options to get in touch with you. If you have any specific medical needs you could even have these printed on Toughtags to stick on your helmet incase you’re unable to communicate those needs to the emergency services after an incident.

The strong, waterproof glue and durable material of Toughtags isn’t just great for kayaking kit, the offcuts shown in the image at the top of this article were used to replace the tattered colour coding labels on my tent poles, and they’re still going strong too!


P.S. I felt a strong sense of irony when completing this article, as I’ve recently lost my own, unlabelled kayak – should have followed my own advice!

If it Ain’t Broke, Make Sure You Have a Repair Kit Handy for When it is!

Until recently, I’ve never carried a repair kit whilst on the river, under the assumption that if I broke any of my equipment I’d either just deal with it or get off the river.

As Chris Brain pointed out to me on a 4* White Water Leader Assessment though, it isn’t always that simple; the toolbox in your car might be incredibly comprehensive, but it’s no use when you’re miles away in a remote gorge with a loose seat and 6km of grade IV to negotiate before the nearest egress.

Bits and Bobs for All Sorts of Jobs

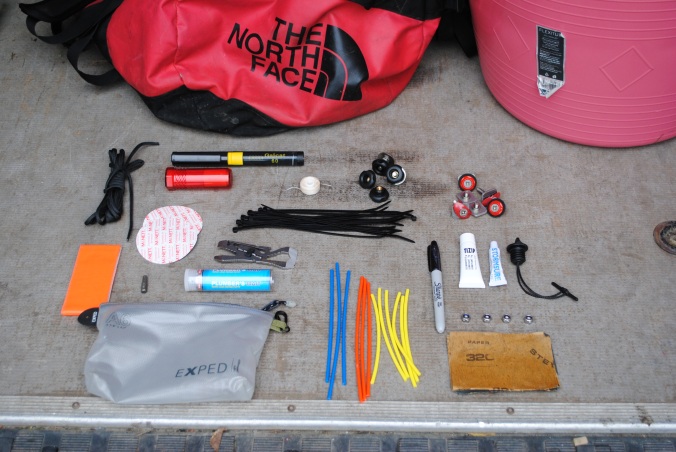
Left to Right, Top to Bottom: Paracord, Butane Welding Pen, Tenacious Tape, Dental Floss + Needle, Footrest Nuts, Miscellaneous Bolts & Nuts, Waterproof Repair Patches, Pocket Tool, Cable Ties, Permanent Marker, Zip Lube, Waterproof Glue, Spare Bung, Duct Tape, Container, Security Torx Bit, Plumber’s Mait, Plastic Welding Rods, Nylon Nuts, Sandpaper + Stanley Knife Blade.

So, I got to putting together a kit to fix the most common issues whilst kayaking, and here’s what it consists of (I won’t go into too much detail with every item, as most have several, fairly obvious and straightforward uses that would take forever to list, but I will pick out some key pieces and give a little more info on them):

A Durable, Water Resistant Container

I’m generally quite picky with my gear choices, and as soon as I started thinking about putting my repair kit together I had a very clear picture of what sort of container I wanted to use – unfortunately, I had no idea if it actually existed!

What I was looking for was a flexible, transparent, pouch style semi-dry container so I could stuff plenty of bits inside without it taking up too much room in my Ocoee Bag. Initially I was looking at pencil cases and document pouches, but nothing I found had a zip that looked like it’d stand up to any abuse – then I walked in to Tamarack Outdoors and saw the perfect solution, the Exped A6 Sized Vista Organiser.

Duct Tape, Paracord and Cable Ties

Plastic Welding Kit

A boat split is probably one of the worst kit breakages you could have on the river, so it’s worth having something with you to repair it; a plastic weld is the neatest and strongest way to do this.

Some people will just carry a lighter and a teaspoon or similar item to smooth the surrounding plastic over the split, but as usual I’ve gone the whole hog and got an Antex Gascat 60 Butane Torch Kit and some Plastic Welding Rods. I chose the Gascat as the lighter is handily built into the lid, and it’s necessary to buy the kit so you get the flame attachment (I don’t carry the other bits with me). I also have some Sandpaper and a Stanley Knife Blade to neaten up the split before and after a weld.

Pocket Tool

The Leatherman Piranha 2 is very compact, and has a screwdriver and various spanner sizes to suit most brands of kayak. I swapped out the additional screwdriver bits for Allen Key ones, and I also carry a Security Torx bit, as these fit the best kayaks in the world (Pyranha, of course!).

Spare Bung and Footrest Nuts, plus Miscellaneous Bolts & Bits

Plumber’s Mait

This stuff is fantastic for quick repairs of boat splits, or for awkward cracks that can’t be welded easily; it’s a putty-like material which is available from most DIY stores and will set solid, even when wet!

Some people will also carry a strip of flash bang for quick split repairs, but this is very difficult to remove afterwards and I’ve decided that I have enough repair options with the plumber’s mait and plastic welding kit.

Items for Quick Dry Gear Fixes

No one wants to paddle for a long period with a leak in their cag, and it could even be quite dangerous if the rip is big enough to cause any of your kit to fill with water; McNett make Tenacious Tape™ and Patches that can be used to do bombproof repairs on small holes or seams and bigger tears.

Drysuit Zip Lube

Spraydeck Repair Gear

A ripped spraydeck can mean anything from distracting drips on your legs to having to stop and empty your boat every couple of hundred metres, but sewing it back up with cotton thread will only last for a short time before the cotton deteriorates and breaks; instead, it’s best to sew a deck using dental floss and a strong sewing needle, then seal the repair with Waterproof Glue.

I’ve still never had to use any of the above (touch wood), but I now feel more confident knowing they’re always on the river with me.

What’s in your repair kit?